Central for Groups at Clemson FAQ
Estimated Reading Time: 8 MinutesCentral
Central is a Clemson application that allows you to create Groups and/or manage the users in Groups. These groups can be used to share messages or data in Canvas, Listservs, and Box.
Open a browser and go to https://central.clemson.edu
2. Click on + CREATE in the upper right corner.
3. Enter a Group Name in the field provided. The Group Name must be a minimum of 9 characters long and no greater than 26 characters long. Hyphen(-) and underscore(_) are the only special characters supported. Spaces are not acceptable. When a checkmark is displayed, you have selected an acceptable group name that is not already in use by another Clemson Group.
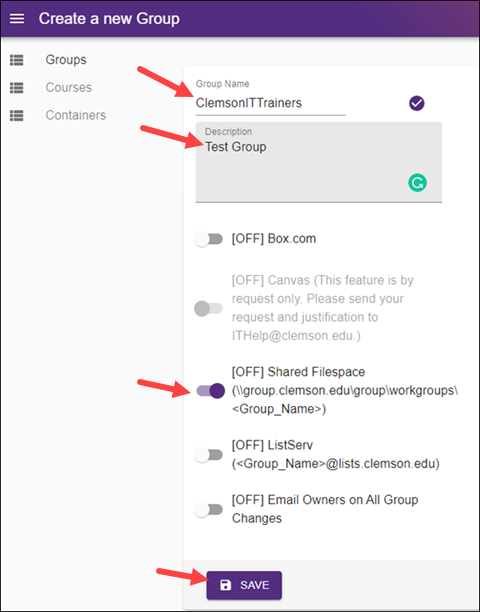
4. Enter a Description.This is a required field and the group will not be created without it.
5. If you want the group to have a Box folder, select Box and request it.
6. If you want this group to have a Canvas account, email ITHELP@clemson.edu.
7.If you want the group to have a shared Filespace, it is recommended that you select Shared Filespace.
8. If you want the group to have a ListServ, select ListServ.
9. Once you have selected all of the options you want for your group, click SAVE.
10. Next you will see "Please remember to save your changes at the bottom of the page." Now you may scroll down to add users to your group. To add one user at a time, type in the username and select the Role. and click ADD USER. If you select BATCH EDIT , you may add a list of usernames separated by a comma. When you are finished, click SAVE .
You can enroll new owners or members individually or by batch.
- Go to http://central.clemson.edu , click on your Group, click on EDIT.
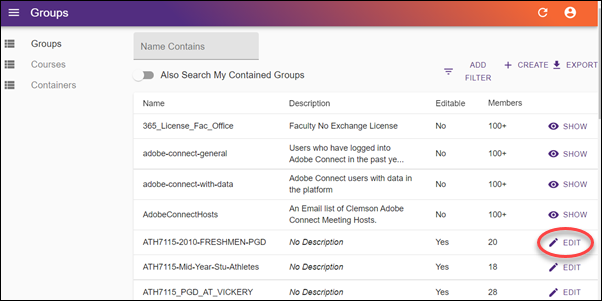
- Click on USERS at the top. You will see the option to Add User by UserID . Type in the User Name of a Clemson user. The default Role is Member. If you want the user to be an Owner, click on the Role field and change it to Owner. Then click ADD USER and SAVE.
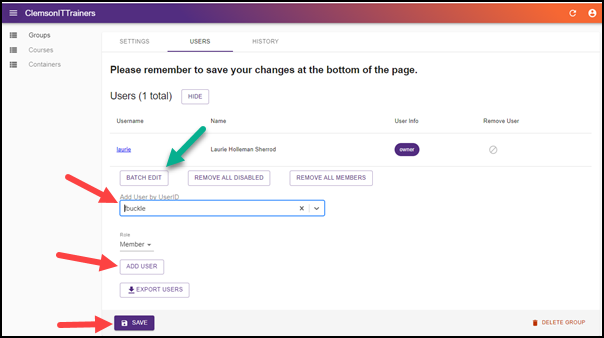
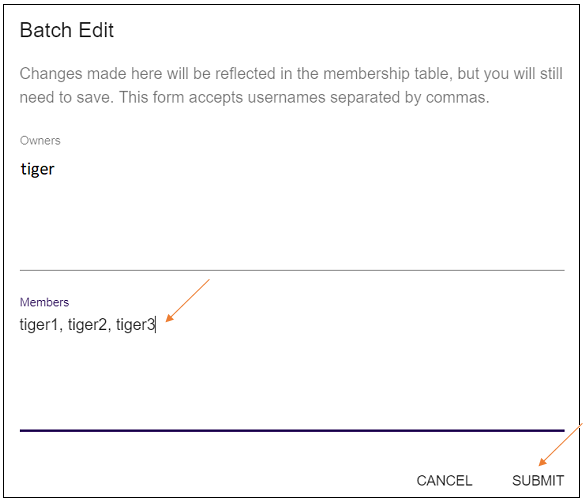
- Or, you can add users using Batch Edit. To do this you will need a list of UserNames separated by commas. If you have more than 1000 users, separate them into separate batches. After clicking BATCH EDIT (green arrow on previous screen), click in the Members field and type (or paste) the list of user names separated by commas. Then click SUBMIT.
- There are many ways to get your list of user names. But one option is to use Excel. Here is a sample way you could use it. If you have your list in an Excel sheet, make a copy of it - and then delete all of the columns except the one with the Clemson UserIDs - leaving it in column A. Then in cell B1, put a comma. Copy that to all of the cells below it that have data in column A except for the last cell (we don't need a comma after the last UserID). Go back to cell C1 and type in this formula: =A1&B1 - then copy that formula to the cells below it. It would look like this sample:
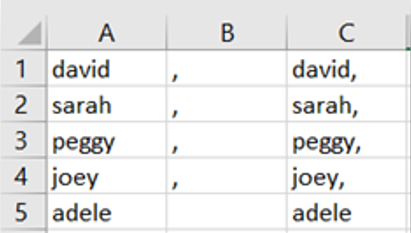
Highlight the cells in column C that have data, copy to the clipboard (press Ctrl-C). Then go to the Members field in Central, paste from the clipboard (press Ctrl-V). This will work for up to 1000 users at a time.
5. After clicking EDIT and USERS, if you have users, you can select one and click on the trash can to delete him. Or there is a Delete Group option at the bottom of the screen to delete the entire Group.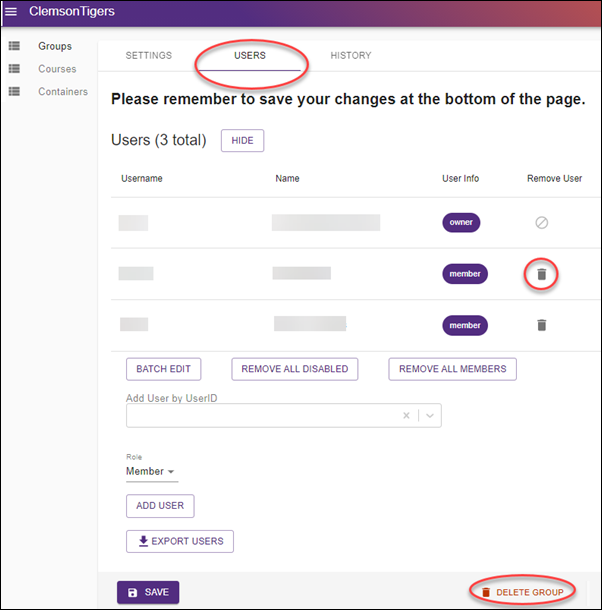
From Central, you can create a Group, and then enable a Listserv for that group. Once enabled, you can use the email address of the Listserv to email the group. For detailed instructions on how to do this, here is an article:
Click here for an article on how to create a Listserv using Central.
Clemson Box offers storage sharing for groups created and managed in Central. Note that employees can create a workgroup either for a class or a group of any kind.
Open a browser and go to https://central.clemson.edu. You should see your workgroups here. If there is not already a workgroup for the group you want, you may click on the +CREATE in the upper right hand corner to create one.

If there is already a group, you may scroll to it and click the EDIT button beside it.
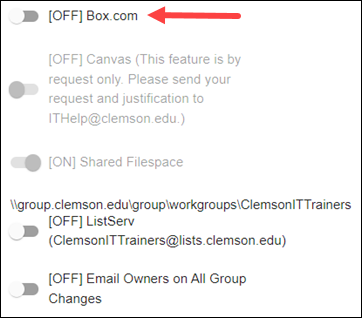
Then click USERS. Now click on the circle beside Box.com to create a Box folder for your group. Note that selected items appear like the ListServ one does below.
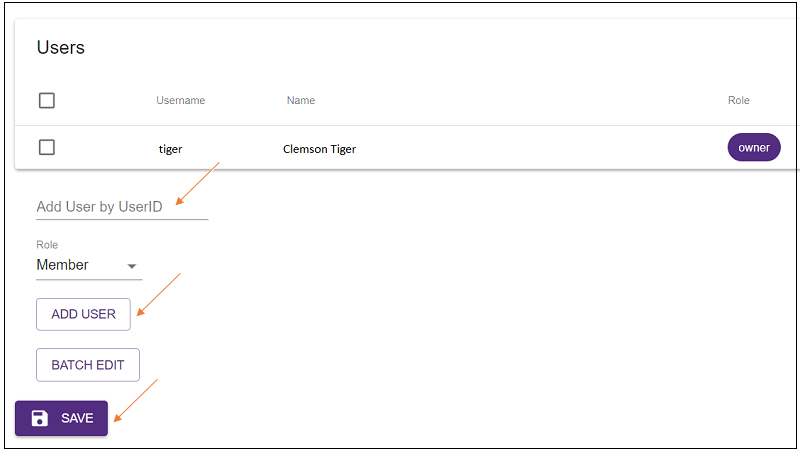
You will need to add the members of your group. One method is to add them one at a time. If you have just created a new group, you will have a choice to add members at the end of the creation process. If you previously created the new group, from the list of groups on the home page of Central, you can select your group and click the EDIT button. Then click USERS. Once you are here, type in the name of a user under the Add User by UserID choice. As you type it in, it will say “User not found” if you type in an invalid user name. Once you have a correct one, it will be black. Then click ADD USER and add any additional ones you want. When you are finished adding users, click SAVE at the bottom.
For large Clemson classes or large groups, you may use BATCH EDIT. You may type in (or paste if you have it available somewhere else) a list of the usernames with a comma after each one. And then click SUBMIT. Here is an example:

Another way to do this would be to use Excel. You could download or type in a list of Clemson user names in an Excel file in column A (removing any other data from the sheet). For a Clemson class, you could take a copy of the roll and strip out every column except one with user names in it. Here is one set of instructions that could be used:
- Open an Excel workbook with only one column of data – the user names of the members of your group in column A.
- Type a “,” (just a comma) in cell B1.
- Copy cell B1 to all of the cells below it until every user name has a comma beside it except the last one (we don’t need a comma at the end).
- In cell C1, type in the formula: =A1&B1 (the result will be the user name with a comma after it)
- Copy cell C1 to all of the cells below it that have user names
Here is a sample of how this might look:
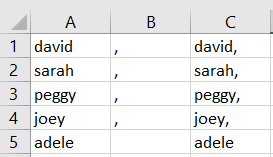
Now highlight all of the cells in column C that have data (with commas). Select Edit, Copy or press Ctrl-C on your keyboard to copy the data to your clipboard.
Go back to the browser where you have http://central.app.clemson.edu open and you are in EDIT GROUP. Click on BATCH EDIT.
Now click on the box that says Members. Press Ctrl-V on your keyboard to paste the list with commas between the user names.
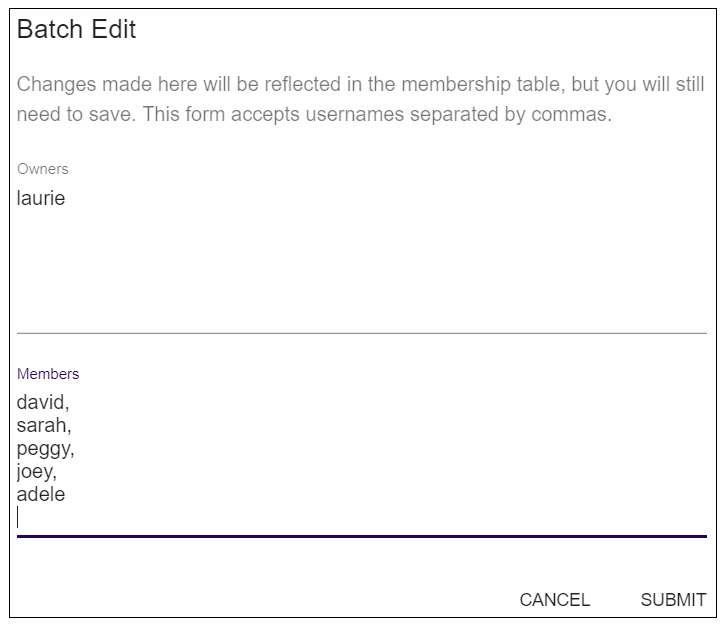
Click SUBMIT to add the users to your Group as Members.
If you go to you will see the new folder in your Box (it will have the same name as your group). You will be the Editor for the folder (which means you may or delete files or folders to it). If your members (or students) go to http://clemson.box.com they will see the same folder. But they will be Viewers – which means they will not be able to add or delete files or folders.
Here is a sample. If you click on the new folder, it will open. You will see the Collaborators on the right-hand side.
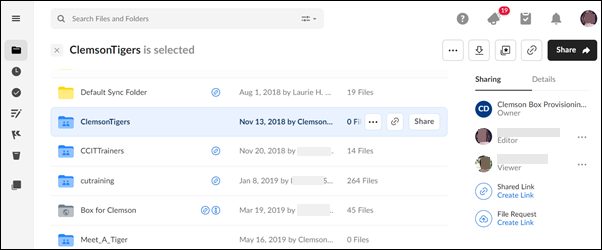
Note: you are the editor – which means you may upload files here. The other members of your group are viewers – which means they can see the files, but not delete or upload files. You may change their permissions from here if you like. Note that an account named “Clemson Box Provisioning Driver” is the actual owner of the folder if it is created from Central.
Here is an article with more information on Creating Listservs lists in Central.
Here is an article with more information on Clemson Box groups created from Central.
If you need more information, email ITHELP@clemson.edu or call 864-656-3494.