Central User Manual
Estimated Reading Time: 8 MinutesThis manual is meant to serve as a comprehensive guide to CU Central (https://central.app.clemson.edu) and all its features. The document is broken into four major sections. This includes one for general layout/UI and three corresponding to the 3 modules of the tool: Groups, Courses, and Containers.
USER INTERFACE
When you visit CU Central (https://central.app.clemson.edu) you initially land on the Groups module which lists all groups to which you belong. The major components of the home screen are as follows:
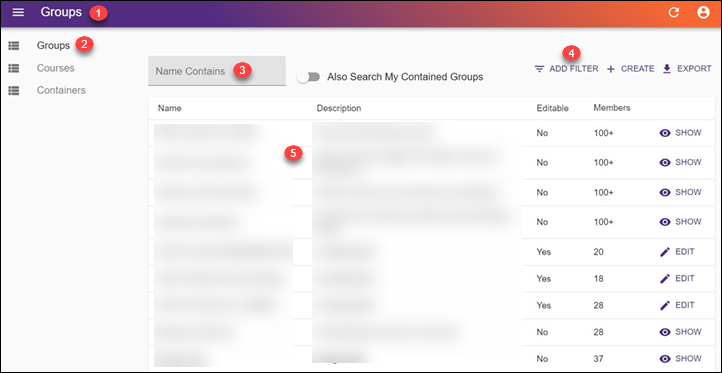
- The label in the top left of the application tells you which module you are currently viewing.
- The left navigation menu allows you to switch between modules.
- The search bar allows you to search your groups for a specific word or phrase. The toggle switch will allow you to also search groups within Containers you belong to or Admins can search all groups.
- The Filter button near the top right of the screen allows you to add additional search filters for description or whether the group is editable by you. There are also buttons to Create a new group or Export the current list of groups.
- Most of the interface is dedicated to the current list of groups and a few of their properties.
- (Not shown) At the bottom of the page there are pagination options allowing the user to choose how many results are shown per page as well as navigate between each page of results.
GROUPS
The groups module allows you to view members and settings for groups you belong to, edit memberships and settings for groups you own (directly or via containers), and create new groups. Creating a new group or viewing an existing group includes many or all the same options as editing an existing group so the remainder of this section will focus on editing a group.
EDITING GROUPS
You are able to adjust group memberships as well as features and options for a group by clicking the Edit button from the main groups page. Within the group editor there are 3 tabs which are outlined below.
SETTINGS
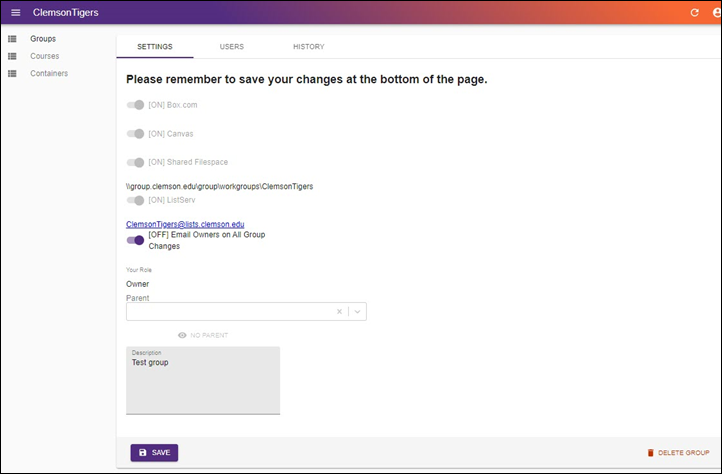
The Settings tab allows you to add or remove features, assign a parent container, and alter or add a description for your group. The available features are currently as follows:
- Box.com – This toggle will create a shared Box folder available a clemson.box.com with the same name as your group. Each member of your group will be added as a collaborator on this folder with a role of ‘Editor’ for owners and ‘Viewer’ for regular members. This is the preferred method for cloud storage and sharing of departmental files and folders as they are owned by a service account and will not be lost as employees or group members join and leave the university.
- Canvas – This toggle will provision a Canvas (https://www.clemson.edu/canvas/) workgroup with the same name as your Central group.
- Shared Filespace – This toggle will provision network storage space for your group. The directory will be available at \\group.clemson.edu\workgroups\[group_name] where [group_name] is the name of your Central group. Click here for an article on mapping network drives.
- ListServ – This toggle will provision an email list with the same name as your group. This feature will create the list and add all group members as subscribers, but all other list settings will remain in their default state. If you are creating a large list or will need to enable special features for your list, you can visit https://lists.clemson.edu or contact CCIT at ITHelp@clemson.edu for further assistance.
- Email Owner on All Group Changes – This self-explanatory setting will cause all group owners to receive email updates when any change is made to the group.
Adding a meaningful description for your group will help your group members tell what the group is for and will help CCIT identify its purpose if you ever need our assistance.
Before any changes are written or features provisioned, you must click the Save button.
USERS
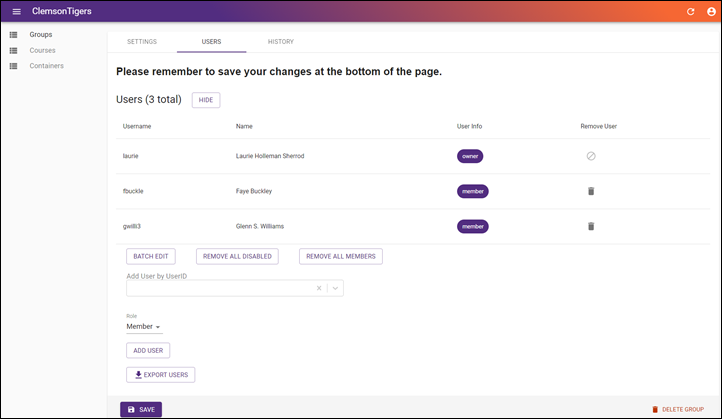
The Users tab of the group editor allows you to add/remove owners and members individually or in bulk.
To add individual user(s):
- Type the person’s username in the Add User by UserID box.
- Choose a role (Member/Owner) from the dropdown.
- Click Add User to have them added to the membership table.
- Repeat steps 1-3 for each user you want to add.
- Click Save.
To batch (bulk) edit group members:
- Click the Batch Edit button.
- Edit or paste your comma separated lists of owners and members in their respective text boxes.
- Click Submit to submit your changes and have them reflected in the membership table.
- Click Save.
There are two addition bulk operation buttons that will help you manage major changes to your group membership.
- Remove All Disabled – As the name implies, this will remember any group member who is no longer affiliated with the university and their Clemson account has been disabled. This will remove them from the membership table, but you will need to click Save before the changes are committed.
- Remove All Members – This button is also self-explanatory as it will remove all members from your group. Group owners will not be removed, and no changes will be committed until you click the Save button.
HISTORY
The history tab has a simple view-only, chronological table of changes made to the group. Each table record includes when the change was made, who made the change, and what was changed.
COURSES
The Courses section of CU Central provides a list of courses to which you belong and allows administrators to view membership for any course.
LAYOUT
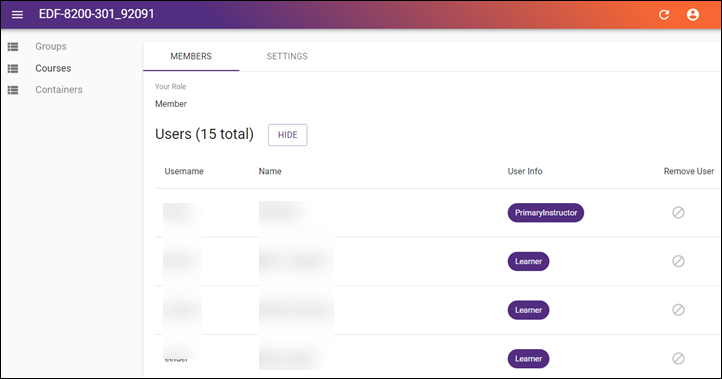
When viewing a specific course, there are two tabs: Members and Settings. The Members tab shows a table of all people in a course, their username, and their role. The Settings tab is currently empty.
SEARCHING
Knowing the naming structure of courses at Clemson will help you when searching for courses within CU Central or even when trying to email your course listserv.
The fictional, example course S1908ECON-1010-001_12345 can be broken down into 5 parts:
- S1908 – The first 5 characters of course names are the letter S followed by the year and month the course started. In this example, the course started in August 2019.
- ECON – This second part of the course name indicated the area of study.
- 1010 – The third part is the course catalog number. The example course in this case is Econ 1010
- 001 – Following the course number is the section number. Large courses or labs may have more than one section.
- 12345 – The final part of the course name is the Course Reference Number (CRN) that is unique to each course section.
Knowing any combination of those course details will help you narrow down your search results.
CONTAINERS
Containers are the newest feature of CU Central and group management at Clemson. Group containers allow you to correlate a collection of groups for easier management whether its overall visibility of related groups or you need to manage groups without being a member of said groups.
Containers are used strictly for hierarchal group ownership and administration. Permissions granted to an individual group within a container are not transferred to the parent container or other children within the container. If you need rights or access granted by a child group, you will need to be a direct owner or member of that group.
LAYOUT
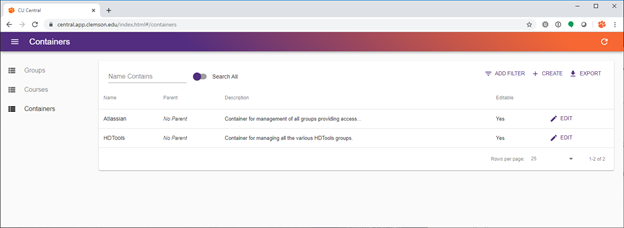
The layout for the Containers module is the same as the Groups module allowing you to view, search, export, and edit your containers or create a new container.
CONTAINER DETAILS
The container editor within CU Central is broken into 4 tabs described below.
SETTINGS
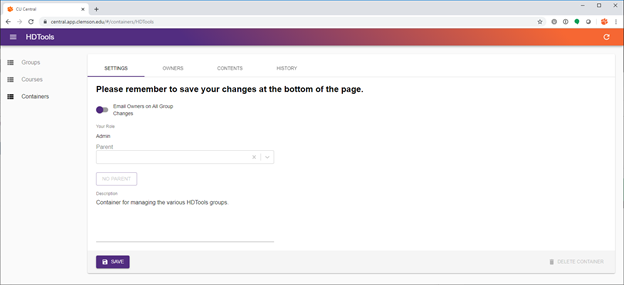
Like the settings tab of the group editor, the container editor allows you to toggle available features, assign a parent container, and add a description. Currently, the only feature available to containers is the ability to email owners upon all changes to said container.
Remember you need to click the Save button before any changes will be applied.
OWNERS
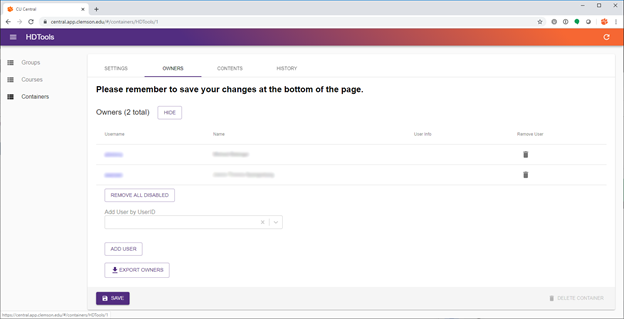
The owners tab of the container editor is similar to the members tab of the group editor. The main difference is containers only have owners as containers are strictly for management rather than granting permissions. Additionally, there are no bulk or batch edit options for managing container owners.
CONTENTS
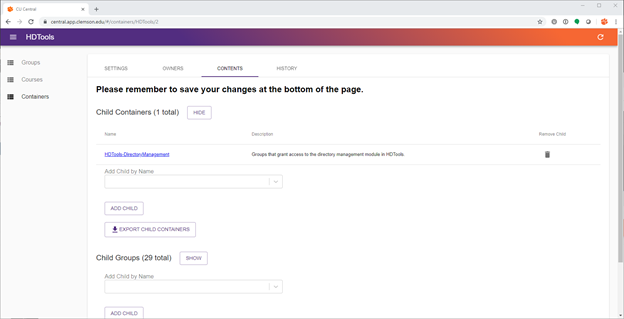
The Contents tab is the heart of the container editor. This is where you add objects to your container in the form of child containers or groups. To add a child container or group, click in the corresponding ‘Add Child by Name’ text box and start typing the name of a container/group you would like to add. After typing at least 3 characters, the autocomplete feature will search for containers/groups with names starting with those characters. Select your desired group from the results and click the Add Child button to add it to the table. You must click Save at the bottom of the page for any changes to be applied.
HISTORY
The history tab of the container editor displays a read-only table of all changes made to the container or any of its children. The table includes when a change was made, who made the change, and what change was made.
If you have more questions, email ITHELP@clemson.edu or call 864-656-3494.