CISCO UNIFIED COMMUNICATIONS SELF-CARE PORTAL
User Guide for Version 11.5
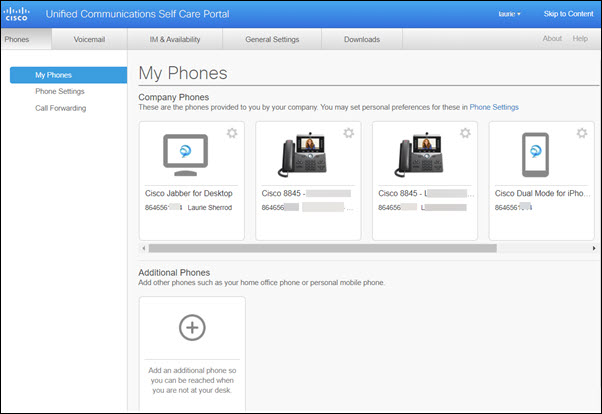
The Unified Communications Self‐Care Portal allows users to configure personal settings for their associated Cisco Unified IP Phones and Jabber applications. Users can customize settings such as speed dials, contact lists, call forwarding, phone services, and some voicemail settings. To go there, open a browser and go to https://ucm.clemson.edu/ucmuser/main#telephonypage . (If you are off campus, you will need to connect via CU VPN before going there.) Once you log in you will see this portal.
OVERVIEW OF THE TABS (horizontally across the top of the dashboard)
ADMINISTERING YOUR PHONE(S)
The Phones tab will allow you to find all settings related to your Cisco IP Phones and any Jabber applications you may have.
On the left side of the page, you will see three sections:
1. My Phones – Summary of all your phones and ability to add new phones
2. Phone Settings – For configuring phone settings (speed dials, ring settings, voicemail notifications)
3. Call Forwarding – For configuring call forwarding options for your phones
EDIT AN EXISTING PHONE
1. From the Phones tab, click My Phones.
2. Once you see a list of all your devices, select the one you wish to modify and then click Edit Phone.
3. You can now change settings, such as descriptions and phone lines.
4. Click Save once you are done.
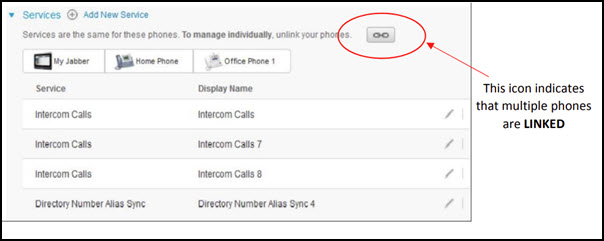
LINKING AND UNLINKING PHONES
Linking phones allows you to have a mirrored configuration across multiple devices. For example, if you have two different phones assigned to you, and you choose to link your speed dial numbers, then both phones will have the same speed dials. To apply a unique phone setting to a single phone, you will need to unlink that phone prior to making the change.
TO LINK OR UNLINK PHONE SETTINGS, DO THE FOLLOWING:
‐ To link a phone setting, click the Unlinked icon and choose which phone you want to use for the base phone. Unified Communications Self‐Care Portal updates that phone setting on all phones with the configuration of the base phone.
‐ To unlink a linked phone setting, click the Linked icon
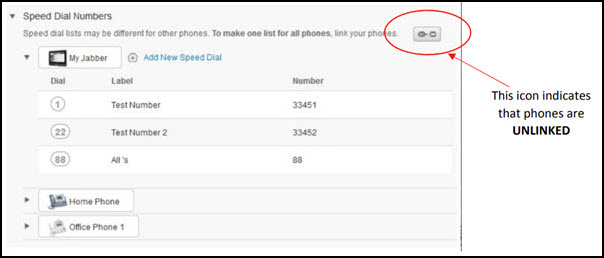
SET UP SPEED DIAL NUMBERS
1. From the Phones tab, click Phone Settings.
2. Click Speed Dial Numbers.
3. Depending on the status of your phones, do the following:
‐ If your phones are linked, click Add New Speed Dial.
‐ If your phones are not linked, select the phone you want to add the speed dial to, then click Add New Speed Dial.
4. In the Number field, enter the contact’s name or phone number.
5. In the Label field, enter a description for the speed dial number. This will appear on your phone screen.
6. In the Speed Dial, text box, assign a speed dial number.
7. Click Save.
SET UP VOICEMAIL NOTIFICATIONS
Voicemail notifications allow you to set up how you want your phone to notify you that there are new messages. For example, you can configure your phones to provide screen prompts, or flash a message‐waiting light to notify you that you have new messages
1. From the Phone tab, click Phone Settings.
2. Click Voicemail Notification Settings.
3. For each of your phones, check the notification option that you want to apply to each phone.
4. Click Save.
SET UP CALL HISTORY
Call history allows you to log missed calls for each of your phones
1. From the Phones tab, click Phone Settings.
2. Click Call History, then check the Log Missed Calls check box for each phone line you want to save the call history for.
3. Click Save.
SET UP PHONE CONTACTS
Phone contacts allow you to store phone numbers and email addresses for your phone contacts. From your phones, you can browse your list of contacts, and place calls directly from the contact list without having to type in the number each time.
1. From the Phones tab, click Phone Settings.
2. Click Create New Contact. A window will appear, prompting you to Add New Phone Contact. 3. Complete all appropriate fields.
4. Click OK.
CALL FORWARDING OPTIONS
Call forwarding user options allow you to set up your Cisco Unified IP phones and Jabber devices to forward calls to another number.
SET CALL FORWARD ALL
1. From the Phones tab, click Call Forwarding.
2. Click the phone number on which you want to set up call forwarding.
3. Check the Forward calls to: check box
4. From the “Forward calls to” drop‐down list, enter the phone number you want to forward calls to.
5. Click Save.
SET ADVANCED CALL FORWARDING OPTIONS
1. From the Phones tab, click Call Forwarding.
2. Click the phone number on which you want to set up call forwarding.
3. Check the Advanced calling rules
4. Use the drop‐down boxes to configure call forwarding options for both internal and external calls.
5. Click Save.
If you have more questions, email ITHELP@clemson.edu or call 864-656-3494.
Article ID: 2878
Created: February 14, 2023
Last Updated: November 12, 2024
Author: Laurie Sherrod
Online URL: https://hdkb.clemson.edu/phpkb/article.php?id=2878