Printing to PaperCut by Queue for Employees
These instructions are for Clemson employees who need to access a PaperCut printer by the queue name. Instructions for Windows 10 / 11 and Mac OS follow. Before beginning, please contact your local tech support person for the name of the Printer Queue that you will be using.
If you are trying to use a printer with card access, look at these articles: Refer to this article for Windows instructions on PaperCut set up. Refer to this article for Mac instructions on PaperCut set up.
NOTE: At the moment, it is best to install paper cut printers while connected to a wired (ethernet) connection or while connected to Clemson’s VPN (CUVPN).
HOW TO INSTALL A PAPERCUT PRINTER BY QUEUE ON WINDOWS 10 OR 11
- Open the Settings window for Windows 10 or 11. This can be found by opening the search tool and searching for "Settings" for the Settings app (or Gear icon).
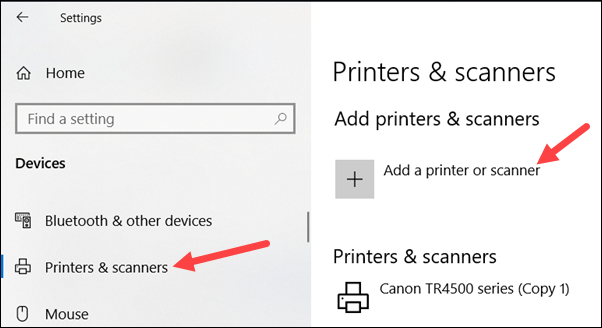
- With the Settings window open, search for "Printers" and select select Printers & scanners .
- Click Add a printer or scanner. After you click the button, Windows will attempt to find printers that it thinks you will want to install. During this process, there will be a few links that show up, as seen in the picture below.
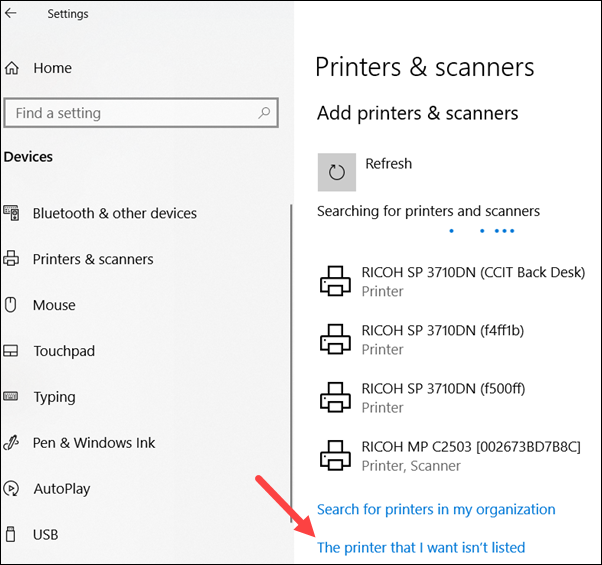
- Click the link labeled The printer I want isn’t listed. This will bring up a new window so that you can specify exactly which printer you want to install.
- In the new Add Printer window that appears, select the option Select a shared printer by name.
- In the text box for the Select a shared printer by name option, you will need to enter the Windows Papercut Queue information for whichever printer that you want to install. Ask your local support technician for the name of the Papercut printer you need to use.
- Once you have entered the Papercut Queue into the text box, click on the Next button at the bottom of the window.

- After a few moments, the window should change to show that the printer was successfully installed on the computer. To finish the process, you just need to click the Next button at the bottom of the window.
- Windows will then ask if you want to print a test page to the newly installed printer. Click the Finish button at the bottom of the window to fully exit out of the installation process.
HOW TO INSTALL A PAPERCUT PRINTER BY QUEUE ON MACOS
- Open the System Preferences. This can be found by clicking the Apple icon in the top left corner and then selecting the System Preferences option in the drop down menu.
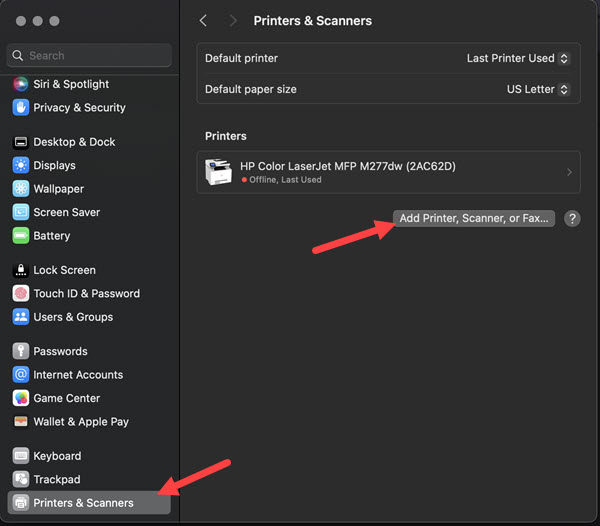
- With the System Preferences window open, click on the Printers & Scanners icon. Click on Add Printer, Scanner, or Fax.
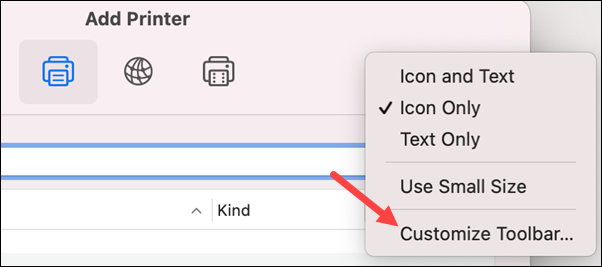
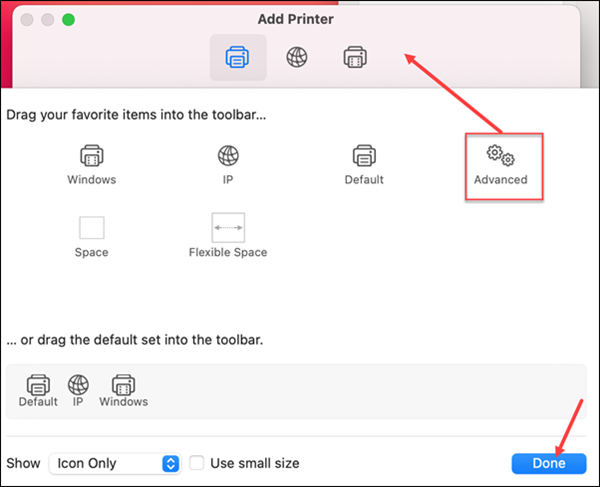
- In the top of the toolbar there will be at least three icons. If the Advanced icon (it looks like two gears) is not in the toolbar at the top of the Add Printer window :
- Control-click the toolbar (in the blank area around the icons in the toolbar) and select Customize Toolbar from the drop-down menu.
- Drag the Advanced icon (looks like two gears) to the empty space beside the other three icons.
- Click Done.
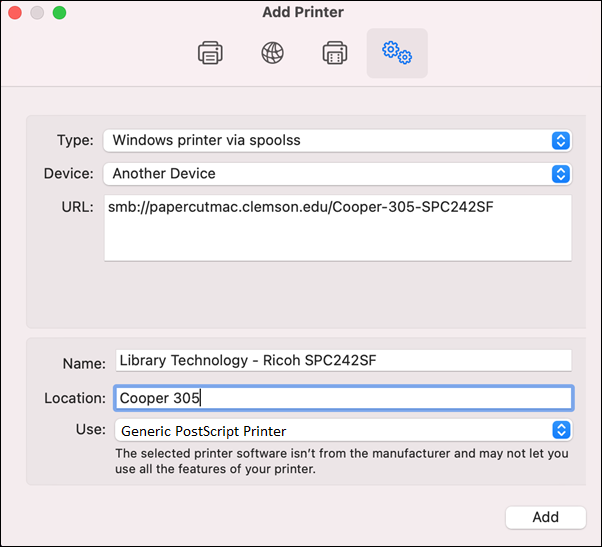
- Click the Advanced icon. This will change the Add Printer window to allow you to enter the needed information for the Papercut Printers.
- In the Type field, select Windows printer via spoolss.
- In the URL field, enter the Papercut Queue information for the specific printer that you want to install after the ‘smb://‘ that is currently in the text box. That information should be provided to you by your local support technician.
- In the Name field, enter a name for the printer that will easily identify which printer you are selecting.
- (Optional) In the Location field, enter the location (Building and Room number) for the printer.
- In the Use field, select Generic PostScript Printer.
- Click the Add button in the bottom right corner of the Add Printer window.
- Another window may appear asking about potential features of the printer, such as if the printer has a Duplexer. You will need to select the option to allow 2-sided printing at that printer.
- Once you have checked the box for the Duplexer, you can click the OK button in the bottom right corner of the window.

If you have more questions, email ITHELP@clemson.edu or call 864-656-3494.